AI Image Upscaler: Enhance Low-Resolution Photos to 4K and | Cliptics
You've got the perfect photo. Except it's tiny. Maybe it's from an old phone. Maybe you pulled it from the web. Maybe it's a scan from an old print. Whatever the source, the resolution is too low to use.
Blow it up and you get pixelated mush. Try to print it and it looks terrible. Use it in a design and it screams amateur. You're stuck.
Traditional upscaling doesn't help. When you tell Photoshop to make an image bigger, it just guesses what pixels to add based on the ones already there. The result is soft, blurry, and obviously upscaled. Better than pure pixelation, but not by much.
AI upscaling is different. These tools actually reconstruct detail that wasn't there in the original. They don't just interpolate. They predict what the high-resolution version would look like based on training on millions of image pairs.
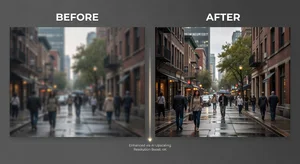
The results can be genuinely stunning. Let me show you how this works and when it makes sense to use it.
How AI Actually Adds Detail
The tech here is pretty wild when you think about what it's doing.
Traditional upscaling takes a 500x500 pixel image and makes it 2000x2000 by filling in the gaps. It looks at surrounding pixels and makes mathematical averages. That's why upscaled images look smooth and blurry. There's no actual new information, just interpolation.
AI upscaling learned from massive datasets of high and low resolution image pairs. The models saw thousands of examples of what a low-res face looks like versus the high-res version. Same for landscapes, text, textures, every visual pattern you can imagine.
When you feed it a low-res image, the AI recognizes patterns and predicts what the high-res details should be. It's not making random guesses. It's applying learned knowledge about how high-res versions of similar images actually look.
The output has genuine detail that wasn't in the original. Skin texture on faces. Individual leaves on trees. Crisp edges on text. The AI is literally generating new information in a way that's visually coherent with the low-res source.
Does it match the real high-res original if one existed? Not perfectly. But it's close enough that for most practical uses, the difference doesn't matter.
When Upscaling Actually Solves Problems
Not every low-res image needs upscaling. Let me be practical about use cases.
Old family photos are perfect for this. You've got prints or scans at 800x600 resolution. You want to frame them large or use them in a photo book. AI upscaling gives you printable quality from sources that would otherwise be unusable.
Web images that looked good on screen but fall apart when you try to use them in print. Maybe you found the perfect reference image for a design project. Upscaling makes it viable for larger applications.
Video stills pulled from footage. Even 4K video, when you grab a single frame, it's often not sharp enough for print use. Upscale it and suddenly it works for marketing materials or presentations.
Scanned documents and old artwork benefit massively. That faded newspaper clipping or vintage poster you want to reproduce at higher quality. Upscaling brings back detail you thought was lost.
On the flip side, if you've got a truly terrible image, completely out of focus or heavily compressed with artifacts, upscaling can only do so much. Garbage in, slightly better garbage out. It's not magic.
Step-by-Step: Your First Upscale
Let's actually do this. Here's how you take a low-res image and enhance it properly.
Step 1: Assess your source
Look at your image critically. What's the current resolution? What do you need it to be? How much detail is actually there versus how much is blur or compression?
If you're starting with something smaller than 500x500, be realistic. You can upscale it, but you're pushing the limits of what AI can reconstruct believably.
Check for compression artifacts, especially in JPEG files. Those blocky patterns around edges. Extreme compression damage is hard for any upscaler to fix cleanly.
Step 2: Choose your upscale factor
Most tools offer 2x, 4x, sometimes 8x upscaling. Don't just default to maximum.
A 1000x1000 image upscaled 2x becomes 2000x2000. That's 4 megapixels, which prints beautifully at 8x10 inches. Do you really need more?
Higher upscale factors take longer to process and produce bigger files. They can also introduce artifacts if you push too far. Start conservative. You can always upscale in stages if you need more.
Step 3: Run the upscale
Upload your image to your chosen AI upscaler. Select your factor. Most tools offer different models optimized for photos versus illustrations versus anime. Pick the one that matches your content.
Processing time varies based on image size and upscale factor. A 2x upscale of a small image might finish in seconds. An 8x upscale of a large file could take minutes.
Step 4: Inspect the results
Zoom to 100% and actually look at what came back. Check faces if there are any. Check text if it's present. Look at textures and edges.
Does it look natural? Or are there weird AI artifacts? Sometimes you'll see unnatural smoothness or invented details that don't quite make sense. Catching these early matters.
Compare to the original. Obviously it should look sharper and more detailed. But does it look like a higher resolution version of the same image, or does it look artificially processed?
Step 5: Post-process if needed
Sometimes the upscaled result is slightly soft or oversaturated. Basic adjustments in any photo editor can dial this in.
A bit of sharpening can add snap to edges. Subtle noise reduction can clean up any artifacts. Color correction if the upscaling shifted tones.
Most of the time this isn't necessary. But knowing you can tweak afterward gives you flexibility.
What Works Best
Different subject types upscale with different levels of success.
Human faces are what these models were heavily trained on. You'll get excellent results on portraits. The AI understands facial structure and adds believable skin texture and feature details.
Landscapes and nature scenes work really well too. Trees, water, clouds, rocks, all the organic complexity that's hard to fake. The AI has seen countless examples and generates convincing detail.
Text and graphics can be hit or miss. If the text is reasonably clear in the low-res version, upscaling makes it crisp. If it's already heavily degraded, results vary. OCR-based approaches sometimes work better than pure image upscaling for extremely low-res text.
Architecture and man-made objects upscale solidly. Straight lines stay straight. Patterns remain regular. The geometric nature of buildings and products helps the AI predict correctly.
Animals and wildlife benefit from the same training models that work well on human faces. Fur texture, eye detail, all of that reconstructs believably.
Common Mistakes That Kill Quality
Here's what trips people up.
Upscaling already-upscaled images: If someone already ran the image through traditional upscaling, that blurriness is baked in. The AI has to work around it. Always start from the smallest, original source you have.
Ignoring compression: If your source image is heavily JPEG-compressed, upscaling amplifies those artifacts. Clean up compression issues before upscaling when possible.
Over-upscaling: Just because you can go 8x doesn't mean you should. The sweet spot is usually 2x to 4x. Beyond that, you're asking the AI to invent more detail than it can reliably predict.
Not testing different models: Most upscaling tools offer multiple AI models. One might work great for photos but terrible for illustrations. Try a few and compare results.
Skipping the inspection step: Always check the output carefully. Sometimes the AI makes weird mistakes that aren't obvious at thumbnail size but are glaring when you look closely.
Creative Applications Beyond Basic Enlargement
Once you understand upscaling, interesting use cases open up.
Recover detail from video: Pull frames from old home videos or vintage films. Upscale them to modern resolutions. Create prints or animations from footage that would otherwise be too low-quality.
Enhance AI-generated images: Some AI image generators produce outputs that are detailed but not huge resolution. Upscale them for large-format prints or professional use.
Restore old artwork: Digital scans of paintings, posters, or photographs from decades ago can be brought to modern quality standards. Great for archival projects or reproduction.
Prepare web images for print: Something that looked fine on your blog at 72 DPI becomes printable at 300 DPI after upscaling. Saves you from hunting down higher-resolution originals.
Scale reference images: Artists and designers working from reference often need bigger versions. Upscaling makes small references usable at the scale you're working.
Quality Expectations
Let me set realistic expectations about what you'll actually get.
Modern AI upscalers in 2026 are genuinely impressive. A good 2x upscale can look nearly indistinguishable from a native high-res capture in many cases. You'd have to inspect closely to spot the difference.
At 4x, you'll see more invented detail. It still looks good, and it's usable for most applications, but pixel-peeping will reveal that the image has been processed.
Beyond 4x, you're in territory where the AI is making significant guesses. Results can still be striking, especially from a distance or in print where viewing distance matters. But closeup inspection will show limitations.
None of this is a criticism. The fact that we can take a 500 pixel square image and make it 4000 pixels while maintaining believable quality is remarkable. Just don't expect miracles from truly terrible sources.
Integration with Other Tools
Upscaling works even better when combined with other AI enhancements.
After upscaling, you might want to adjust colors and lighting. Standard photo editing tools work fine, or you can use AI-powered enhancement for automatic improvements.
Noise reduction pairs well with upscaling. Sometimes the upscaling process reveals grain or noise that was hidden in the low-res version. Clean it up afterward.
Background removal or subject isolation can happen before or after upscaling. Either workflow works, though upscaling first sometimes gives cleaner edges for subsequent processing.
And if you're working on restoration projects, combining upscaling with AI-based scratch and damage removal creates powerful before-and-after transformations.
Where This Is Heading
The technology improves noticeably month to month.
We're seeing models that better handle extreme upscaling. 8x, 16x, even higher factors with increasingly believable results. The limits keep pushing back.
Real-time upscaling is becoming viable. Process video on the fly rather than rendering each frame individually. Useful for content restoration and streaming applications.
Domain-specific models trained on particular image types produce even better results for specialized uses. Medical imaging upscaling. Satellite imagery enhancement. Each field gets optimized models.
And integration into standard software means upscaling becomes a normal part of image workflows rather than a specialized technique.
Making This Part of Your Workflow
If you work with images regularly, upscaling should be a tool you know how to use.
For photographers, it salvages shots you thought were unusable. That perfect moment captured at too low a resolution becomes printable.
For designers, it expands your options for sourcing reference and stock imagery. Lower-res options become viable after upscaling.
For content creators, it ensures your visual content meets quality standards across all platforms and formats. Web to print, small screen to large display, everything scales appropriately.
The barrier to entry is basically zero. Most upscaling tools are free or cheap. The learning curve is minimal. Upload, click, download. You can master the basics in an afternoon.
So next time you've got an image that's perfect except for resolution, you know exactly what to do. Upscale it. See what the AI can recover. You might be surprised how much detail was hiding in those limited pixels.