Compress Images for SEO Without Losing Quality | Cliptics
Images are often the heaviest elements on a webpage. A single unoptimized hero image can weigh more than 3MB, and when you stack a few of those on a product page or blog post, you're looking at load times that kill both user experience and search rankings.
Google has been using page speed as a ranking signal for years. Core Web Vitals, which explicitly measure load performance, are now a real factor in organic search position. So image compression isn't just a technical nicety. It directly affects how well your pages rank.
The good news: compressing images properly doesn't mean making them look worse. Done right, the visual quality is indistinguishable while the file size drops by 60 to 80 percent. Here's how to approach it.
Understanding Why File Size Matters for SEO
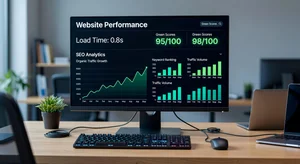
A page that loads in under two seconds retains significantly more visitors than one that takes four seconds. And for every additional second of load time, conversion rates tend to drop. This isn't abstract theory; it's consistent data across e-commerce and content sites.
Search engines also crawl pages more efficiently when they load faster. A slow page doesn't just frustrate users; it means the crawler spends more of its budget on your slower pages, which can affect how much of your site gets indexed.
Images are the biggest lever most website owners have for improving page speed because they're typically the largest files on the page and they're often uploaded without any optimization at all.
Choosing the Right Format Before You Compress
Before compressing, pick the right file format. JPG works well for photographs and images with lots of color variation. PNG is better for images with text, transparent backgrounds, or flat color areas like logos. WebP is a newer format that delivers smaller files than both JPG and PNG at equivalent quality and is now supported across all major browsers.
For most website images, especially product photos and blog images, WebP gives you the best compression efficiency. If your site or e-commerce platform supports it, make it your default export format.
For existing libraries of JPG and PNG files, you don't need to reformat everything. Compress what you have first, then migrate to WebP for new uploads going forward.
How to Compress Without Losing Visible Quality
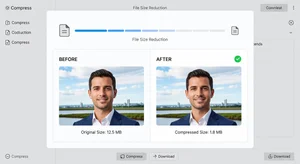
The key is targeting an appropriate quality level for web display. For most website images, 75 to 85 percent quality produces files that are visually identical to the original at 30 to 50 percent of the original file size.
Cliptics' image compressor handles this automatically, applying smart compression that preserves visual quality while reducing file size. You can compress JPG, PNG, and WebP files with no signup required.
For specific formats, the JPG compressor and PNG compressor give you more targeted control if you're processing format-specific batches. There's also a WebP compressor if you're working with modern format images.
The Right Compression Settings for Different Use Cases
Not all images need the same level of compression. Here's a practical starting point:
Hero images and banners: aim for 100 to 150KB maximum. These are large and load early, so they have an outsized effect on perceived load time.
Product photos: 50 to 100KB per image. On a product page with multiple images, this adds up fast. Keep each one lean.
Blog content images: 60 to 120KB. They sit mid-page, but if you have several in one post, cumulative weight adds up.
Thumbnails and small icons: under 20KB. These don't need much at all.
If your compressed file is still above these targets, it usually means the original was larger than necessary to begin with. Consider resizing dimensions before compressing; a 4000px wide photo being displayed at 800px doesn't need all those pixels.
Adding Alt Text After Compression
Compression handles the technical performance side, but images also affect SEO through their alt text. Alt text tells search engines what an image depicts and contributes to how relevant a page appears for image search and related queries.
After compressing your images, make sure each one has descriptive, natural-sounding alt text that reflects the image content and fits naturally into the page context. Not stuffed with keywords. Just an accurate description written like a caption.
Making This Part of Your Standard Workflow
The mistake most website owners make is treating image optimization as a one-time project rather than a standard step. Set a simple rule: every image that goes on your site gets compressed before it's uploaded. That's it.
It takes an extra minute per image. Over the life of your site, it's the difference between a fast, well-ranked site and one that slowly accumulates performance debt as images pile up.
Using free browser-based tools means there's no cost and minimal friction. The workflow is: resize if needed, compress, add alt text, upload. Build that habit and your SEO will improve consistently over time.
What to Expect in Practice
After compressing your existing images and switching to optimized uploads going forward, you should see measurable improvements in PageSpeed Insights scores within a few weeks, assuming image weight was a primary bottleneck.
For sites with large image libraries, prioritize the highest-traffic pages first. The pages that get the most visitors are where load time improvements have the biggest impact on both rankings and conversions.
Images are one of the easiest and highest-use SEO improvements available. It doesn't require technical expertise, doesn't cost anything, and the results are real.