Convert Blog Articles to Voice and Video — Best Tools + | Cliptics
You've spent hours writing a solid blog post. Maybe it ranks well. Maybe it gets some traffic. And then it just sits there, doing one job, in one format, on one platform. That's a waste.
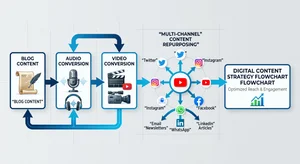
Every written piece of content can become three to five different formats without writing a single additional word. A blog post becomes a podcast episode. A podcast episode becomes a YouTube video. A YouTube video gets clipped into shorts. A short becomes a carousel post. The same ideas, the same research, the same value, distributed across every platform your audience actually uses.
This is content repurposing, and AI voice and video tools have made it faster and cheaper than it's ever been. Here's exactly how to do it.
Why This Strategy Works Right Now
Algorithm changes on every major platform have made organic reach increasingly difficult for written content. Google search competition is fierce. Social media reach for links is down. But audio and video consumption is way up. Podcast listening, YouTube watch time, and short-form video consumption have all grown substantially.
Your audience may prefer reading. Or they may prefer listening during their commute. Or watching while they cook. Creating the same content in multiple formats isn't about reaching different people necessarily, it's about reaching the same people in whichever mode they happen to be in that day.
For content marketers, the math is compelling. One strong blog post with solid research and structure is the hard part. Converting it to voice and video requires maybe an hour with the right tools.
Step 1: Prepare Your Blog Post for Audio
Not every blog post converts directly to a good audio script. A few edits before you generate voice:
Remove visual references. Phrases like "see the chart above" or "in the image below" make no sense in audio. Replace them with descriptions: "the data shows" or "as an example."
Simplify complex sentences. Long, nested clauses that work in reading become hard to follow when spoken. Break them into shorter sentences. Your listener can't scroll back.
Add transition language. Spoken content needs explicit verbal signposting. "Now let's talk about," "here's the thing," "before I get to that." In reading, section headings do this work. In audio, you need it in the prose.
Spell out numbers and abbreviations. Write "twenty-five percent" not "25%". Write "search engine optimization" not "SEO" on first mention.
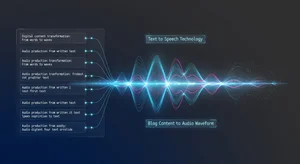
Step 2: Generate the Voiceover with AI TTS
Cliptics Text to Speech handles long-form content well, which matters for blog posts that might run 1000 to 2000 words. Paste your adapted script, select a voice that matches your brand's personality, generate, and download the audio file.
For content with multiple voices or a dialogue format, Cliptics multi-speaker TTS is worth exploring. A blog post structured as a Q&A can become a more engaging audio experience with distinct voices for the question and answer sides.
The multi-voice TTS on Cliptics takes this further, letting you assign different voice characteristics to different parts of the script. This works particularly well for content that features quotes or testimonials from different sources.
Listen to the generated audio before moving forward. Most AI voices handle standard prose well, but technical terms, brand names, and unusual word combinations sometimes get mispronounced. You can typically fix these by adjusting the spelling in the script (writing "Klip-tiks" phonetically instead of "Cliptics" if needed, or adjusting punctuation to control pausing).
Step 3: Package the Audio as a Podcast Episode
With your audio file generated, turning it into a podcast episode requires:
An intro and outro segment. Most podcast hosts have brief branded intros. If you don't want to record yours, generate it with TTS using a slightly different voice or tone than your main content voice. Keep it under 30 seconds.
Podcast hosting platform. Buzzsprout, Podbean, Anchor (Spotify for Podcasters), and several others offer free tiers. Upload your audio, add title, description, and thumbnail, and your episode is available wherever podcasts are distributed.
Show notes that link back to the original blog post. This creates a content connection that's good for SEO and helps listeners find more context on the topic.
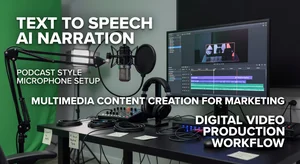
Step 4: Convert the Voiceover to a YouTube Video
A voice file alone isn't a YouTube video. You need visuals. A few approaches depending on your time and resources:
Slide-based video: Create simple slides in Canva or Google Slides that match your blog post structure. One key point or quote per slide, minimal text. Export as images, import into any basic video editor (even iMovie or Windows Video Editor), add your audio track, and export as MP4.
Screen recording: For tutorial content, record your screen walking through whatever process the blog covers while the AI voiceover plays. Camtasia, OBS, or Loom work for this.
Stock footage video: For more produced results, combine B-roll stock footage that's relevant to your topic with the voiceover. Pexels and Pixabay have free stock video. This takes more editing time but results in a video that looks professionally produced.
Text animation video: Tools like Adobe Express or InVideo can create animated text videos where key phrases appear on screen as they're spoken. Works particularly well for lists, tips, and advice content.
The free text to video generator on Cliptics streamlines this workflow, combining script to video in a more integrated process that saves the step-by-step assembly.
Step 5: Clip Shorts from the Full Video
Once you have a full video, identify three to five moments from the content that stand alone as insights. A surprising statistic, a counterintuitive point, a clear actionable tip. These become your short-form clips for YouTube Shorts, Instagram Reels, and TikTok.
Keep clips between 30 and 60 seconds. Add captions. Most social platforms auto-generate captions but they're not always accurate for AI-generated voice, so check and correct them.
Short-form clips drive discovery, and they point interested viewers to the full-length version. This creates a content space from a single written piece.
Building a Repeatable System
The first time you do this, it takes a few hours. By the tenth time, the whole workflow from adapted script to published video takes 60 to 90 minutes. That's what makes it viable at scale.
Build a checklist specific to your tools and process. Something like: adapt blog script, generate TTS audio on Cliptics, listen and correct, export audio, create slides or source footage, assemble video, export, upload to YouTube with SEO metadata, clip shorts, publish shorts across platforms, upload audio to podcast host.
Every blog post you publish from this point is actually multiple content assets. The written version, the audio version, the full video, and the short clips. For the same effort as writing one blog post, you're now distributed across four platforms. That's the whole game.