Free Green Screen Remover: Chroma Key Your Videos and | Cliptics
You just draped a ten dollar green sheet behind your desk, hit record, and now you are staring at footage that still has a very green, very obvious background. The free trial of that editing suite expired two days ago. Premiere Pro costs more than your monthly grocery bill. And every YouTube tutorial assumes you already own software that runs four hundred dollars a year.
I have been there. Most indie creators have. The gap between "I own a green screen" and "I can actually remove this green screen" is way wider than it should be. But here is the good news: in 2026, you genuinely do not need expensive software to pull a clean chroma key. Not for YouTube videos. Not for Twitch streams. Not even for short film projects with tight budgets.
This guide walks through every free option that actually works, the settings that make the difference between a clean key and a halo disaster, and the mistakes that waste hours of editing time.
Why Chroma Key Still Matters When AI Background Removal Exists
Fair question. AI powered tools like Cliptics background remover can strip backgrounds from photos and even video frames without any green screen at all. So why bother with the fabric?
Because consistency matters. AI removal works frame by frame, and slight differences between frames create flickering edges in video. Green screens give the software a uniform color target, which means cleaner edges, zero flickering, and results that hold up at full resolution. For streamers running live, AI processing also adds latency that a straight chroma key does not.
Think of AI background removal as the convenience option for photos and quick clips. Green screen removal is the reliability option for anything longer or live.
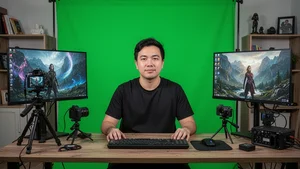
Setting Up Your Green Screen on a Budget
Before we touch software, the setup itself determines eighty percent of your results.
First, wrinkles are the enemy. A wrinkled green screen creates shadows, and shadows are darker shades of green that the keyer reads as a different color. Stretch the fabric taut or steam it flat. If you are using a collapsible panel, make sure it locks in place without bowing.
Second, distance matters. Stand at least four to six feet away from the screen. Too close and green light bounces off the fabric onto your skin and clothes, creating spill that is painful to remove in post.
Third, lighting. Two cheap softbox lights pointed at the green screen from forty five degree angles will eliminate shadows and give you an even color. Do not light yourself and the screen with the same source. That is the fastest path to uneven keying.
Entire setup cost: a ten dollar green sheet, two twenty dollar softbox kits, and a few clamps. Under sixty dollars total.
Free Software That Actually Pulls a Clean Key
Here is where most guides lose people. They list fifteen tools without telling you which ones are actually worth your time. I will keep this to the options I have personally tested and gotten usable results from.
OBS Studio for Live Streaming
If you are a streamer, OBS Studio is the answer. It is free, open source, and has a built in chroma key filter that works in real time.
Right click your video source, select Filters, add a Chroma Key filter, and pick green as your key color. The default settings are surprisingly good. If you see fringing, drop the Similarity slider by ten to fifteen points and bump Smoothness up slightly. That handles ninety percent of setups.
For tighter control, switch from the Chroma Key filter to the Color Key filter instead. Color Key gives you separate controls for Similarity, Smoothness, Key Color Spill Reduction, and Opacity, which lets you fine tune edges that the basic Chroma Key filter struggles with.
Cliptics Green Screen Remover for Photos and Stills
For still images and individual frames, the Cliptics free green screen remover handles chroma keying directly in your browser. Upload your image, the tool detects and removes the green background, and you can either download with transparency or swap in a new background.
This is especially useful for YouTubers creating thumbnails. Shoot yourself in front of the green screen, pull the image into the tool, drop in whatever background fits the video topic, and export. No Photoshop subscription. No complex layer masking.
DaVinci Resolve for Video Editing
DaVinci Resolve's free tier includes a full chroma keyer in the Color page that rivals tools costing hundreds of dollars. Open the Qualifier panel, select the eyedropper, click on the green in your footage, and Resolve builds a key automatically.
The 3D Qualifier is where Resolve really shines. It samples the green across hue, saturation, and luminance simultaneously, which means uneven lighting that would destroy a basic keyer gets handled gracefully. Refine with the Matte Finesse controls, specifically Clean Black and Clean White, to eliminate any remaining semi transparent areas.
Kdenlive and Shotcut for Lightweight Editing
If Resolve feels heavy for your machine, both Kdenlive and Shotcut are free, open source video editors with chroma key effects. They are less precise than Resolve but perfectly capable for YouTube content. Apply the Chroma Key effect, set the color to green, and adjust the variance slider until the background disappears cleanly.
The Settings That Separate Good Keys From Bad Ones
Every tool has roughly the same set of controls, just named slightly differently. Understanding what they do saves hours of guessing.
Similarity or Variance controls how wide the range of green shades the tool removes. Too low and patches of green survive. Too high and it starts eating into your subject's colors, especially anything with yellow or teal tones.
Smoothness feathers the edge between what stays and what goes. Zero smoothness gives hard, jagged edges. Too much smoothness makes you look like a ghost fading into the background. Start around thirty percent and adjust in small increments.
Spill Suppression handles green light that bounced onto your skin or clothes. If your subject has a faint green tint along the edges, crank spill suppression until the tint disappears. Most tools offer this as a secondary step after the main key.
Key Color Selection seems obvious but trips people up. Instead of choosing a generic green from a color picker, use the eyedropper tool to sample the actual green in your footage. Every green screen has a slightly different shade, and the eyedropper captures the exact value.
Common Mistakes That Wreck Your Results
Wearing green. Sounds obvious, but it extends beyond shirts. Jewelry with green stones, watches with green accents, even certain shades of khaki can get picked up by aggressive key settings. Check your entire outfit before recording.
Ignoring motion blur. Fast arm movements create blurred edges where your skin color mixes with the green background. The keyer cannot separate blurred mixed pixels cleanly. Solution: increase your shutter speed. A shutter speed of 1/120 or faster reduces motion blur enough that edges stay sharp during movement.
Overcompressing footage. Green screen removal needs clean color data. If your camera records in highly compressed formats, the green starts to break down into blocky artifacts that the keyer reads inconsistently. Record at the highest quality your storage allows. If your camera supports it, choose a 4:2:2 chroma subsampling setting over 4:2:0.
Skipping the despill step. Even a good key leaves green spill on edges. Always run a despill pass after keying, whether that is a dedicated Despill node in Resolve or the spill suppression slider in OBS.
When to Skip the Green Screen Entirely
Sometimes you do not need one at all. For static photos where you need background removal, AI tools like Cliptics blur background or the background remover handle the job without any special setup. Upload the photo, the AI identifies the subject, and the background gets removed or replaced.
This approach works well for product photography, profile pictures, and social media content where you need quick turnaround and the footage is not video.
Putting It All Together
Here is the workflow I recommend for budget creators in 2026:
For live streaming, use OBS Studio with its built in chroma key filter. Spend fifteen minutes dialing in your settings once, save the filter profile, and never think about it again.
For YouTube videos, record your footage in front of the green screen at the highest quality your camera supports, then edit in DaVinci Resolve using the 3D Qualifier for a broadcast quality key at zero cost.
For thumbnails and photos, skip the manual keying entirely and use the Cliptics green screen remover to handle it in seconds.
The expensive software era for chroma keying is over. The tools are free. The techniques are documented. The only thing standing between you and a clean key is a wrinkle free green sheet and twenty minutes of setup time.