How to Edit Product Photos Without Photoshop (Beginner | Cliptics

A lot of people assume that getting good product photos requires a professional studio setup and Photoshop skills. And if you've opened Photoshop before and felt immediately lost, you probably gave up on the idea of editing your own product photos at all.
Good news: you don't need Photoshop. You don't need any design background. With a decent photo from your phone and a few free browser-based tools, you can produce product images that look clean and professional. This guide walks through exactly how to do that, step by step.
What You Need to Start
Before any editing happens, the photo itself matters. A few things that make editing easier:
Good lighting. Natural light near a window works surprisingly well. Avoid harsh shadows by using a white sheet or card to bounce light onto the shaded side of your product.
A plain background to start. A white bedsheet, a clean wall, or a simple surface makes background removal much easier and gives the AI tools cleaner edges to work with.
A steady shot. Rest your phone against something or use a timer so there's no camera shake. Blurry photos can't be sharpened later.
Once you have a usable photo, the editing steps are straightforward.
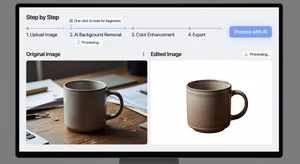
Step 1: Remove the Background
This is the most transformative step for most product photos. Cliptics' background remover takes your photo and automatically cuts out the product, leaving just the subject on a transparent background.
Here's how to use it:
Go to the background remover link above. Click upload and select your product photo. Wait a few seconds. Download the result.
That's really it. The AI does the detection work automatically. You don't need to trace anything or use selection tools. For most standard product photos, the result is very clean, especially when the original had decent contrast between the product and whatever was behind it.
Once you have the transparent background version, you can leave it as-is for use on websites that support transparency, or place it on a white background for marketplaces like Amazon and Etsy that require white backgrounds.
Step 2: Fix Brightness and Color
Raw product photos often need small adjustments. Maybe the colors look a bit washed out, or the image is slightly too dark or bright. Cliptics' AI image editor handles these corrections in a simple interface.
For beginners, the easiest approach is to use the quick enhance option if available, which automatically adjusts brightness, contrast, and saturation to improve the overall look. For more control, you can manually adjust individual sliders.
A few adjustments that almost always help product photos:
Brightness: bring it up slightly if the photo looks dark or muddy.
Contrast: a small increase makes products pop more from the background.
Saturation: careful here. A slight increase makes colors more vivid. Too much makes everything look fake.
Make these adjustments gently. Subtle changes look natural. Heavy edits look processed and can actually make customers trust the photo less, because they worry the product won't look the same when it arrives.
Step 3: Blur the Background (Optional)
If you want a more polished look rather than a plain white background, adding a soft background blur gives your product photos that professional studio depth-of-field effect. Cliptics' blur background tool applies this automatically.
This works especially well for lifestyle-style product shots where you want some context around the product but don't want a busy background competing for attention.
Step 4: Compress Before You Upload
This step is easy to skip, and many beginners do skip it, but it matters. Product photos fresh from your phone or camera are often 3 to 8MB in size. That's too large for websites and online stores, which load slower with heavy images.
Cliptics' image compressor reduces the file size by 60 to 80 percent without visible quality loss. Upload your finished edited image, download the compressed version, and that's what you use for uploading.
For e-commerce listings, aim for images under 500KB ideally. For your own website, under 150KB is better for page speed.
Step 5: Check the Final Result
Before you upload anywhere, zoom into your edited image at 100 percent and check:
Are the edges of the product clean? Background removal sometimes leaves slightly rough edges. If the main visible area of the product looks clean, it's fine.
Are the colors accurate? The photo should represent what the product actually looks like. If it's dramatically different, pull back some of those saturation or brightness adjustments.
Does it look professional? Hold it alongside a product photo from a brand you respect. Are they in the same ballpark? It doesn't need to be identical, but it shouldn't look obviously amateurish.
A Few Common Beginner Mistakes to Avoid
Over-editing. Less is almost always more. If the photo starts looking heavily processed, dial back every adjustment by half.
Saving the compressed version as your master file. Always keep the full-resolution edited file before compression. The compressed version is for uploading, not for future editing.
Inconsistent backgrounds across products. If your store has some products on white backgrounds and some on colorful lifestyle backgrounds, it looks messy. Pick a style and stick with it.
Forgetting to name files descriptively. Instead of IMG_4821.jpg, rename files to something like blue-ceramic-mug.jpg. It's better for SEO and just makes your files easier to manage.
You Really Can Do This Without Design Skills
The honest truth is that these tools have made product photo editing genuinely accessible for people with zero design background. The AI handles the technically hard parts, background detection and removal, smart enhancement, while you just make the simple adjustments.
Consistency matters more than perfection. A set of 20 consistently clean, bright photos with simple white backgrounds will outperform a set where some have polished studio shots and others look like phone snaps. Build a simple workflow, do the same steps for every product, and your store will look put-together without you needing to spend a dollar or learn a complicated tool.