How to Resize Images for Different Social Media Platforms | Cliptics
If you've ever uploaded a photo to one social platform and then tried to use it on another, you've probably noticed the results are rarely perfect. Vertical photos get cropped weirdly on Twitter. Square images look fine on Instagram but leave awkward white bars on LinkedIn. Your carefully composed shot suddenly loses its main subject because the platform cropped the edges.
This happens because every platform has its own preferred image dimensions, and they don't agree with each other. But once you know the right sizes, resizing images for each one takes minutes.
Why Platforms Use Different Image Sizes
Each social platform was designed around different use cases and screen layouts. Instagram, built for visual storytelling, defaults to square and portrait formats. Twitter uses landscape crops for link previews. LinkedIn is optimized for horizontal banner-style images. Pinterest favors tall vertical pins that take up more feed space.
These aren't arbitrary decisions. They reflect the platform's design philosophy and how users scroll through content. An image that's been resized to fit each platform's preferred ratio tends to perform better than one that gets auto-cropped in ways you didn't intend.
The Most Common Sizes You Need to Know
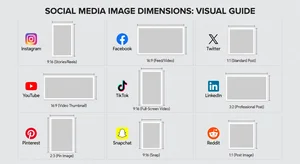
Here are the standard sizes for major platforms as of 2026:
Instagram feed posts work best at 1080 x 1080px (square) or 1080 x 1350px (portrait, which tends to show larger in the feed). Stories and Reels are 1080 x 1920px.
Facebook feed images display cleanly at 1200 x 630px. Profile photos are 170 x 170px.
Twitter feed images look best at 1200 x 675px. Profile photos are 400 x 400px.
LinkedIn posts perform well at 1200 x 627px. Profile banners are 1584 x 396px.
Pinterest pins work best tall, at 1000 x 1500px. Standard landscape pins are 1000 x 750px.
You don't need to memorize all of these. What matters is knowing that platforms differ, and that a single-size approach will cause problems.
How to Resize Quickly Using Free Tools
The fastest approach: use a free online resizer that lets you input custom dimensions. Cliptics' JPG resizer handles JPG photos, while the PNG resizer handles PNG files. There's also a WebP resizer if you're working with modern format images.
Here's the workflow I recommend for creators who post regularly:
Start with your highest-resolution original. That's the one you download from your camera, phone, or design tool before any editing. Never save resized versions as your master file.
Create a folder system for each platform. When you export a resized version, save it in the relevant folder so you always know which file goes where.
Resize for your priority platform first, then create variations. If Instagram is your main channel, create the 1080 x 1350 version first. Then resize that original (not the Instagram version) for each other platform.
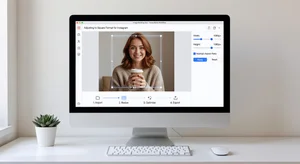
Using the AI Image Editor for Multiple Edits at Once
If you're resizing and also making other adjustments, like cropping to a different focal point, adjusting brightness, or removing an element from the background, Cliptics' AI image editor lets you do that in one session.
This matters because every time you save and re-export an image, there's potential for quality loss if you're working with compressed formats. Doing all your edits in one pass and exporting once preserves the best quality.
What About Images That Don't Crop Well?
Sometimes a landscape photo just doesn't fit into a square without losing the key subject. A few options for this:
Add padding. Keep the original photo centered and add a colored border to fill the square frame. This works especially well for branded content where you have consistent brand colors to fill the space.
Use an AI extender. Tools that can intelligently fill in background around the edges of an image can turn a landscape shot into a taller format without cropping out your subject.
Recrop from the original. If you have a large enough original, sometimes you can crop a square version from the center without losing what matters.
Staying Consistent Across Platforms
The creators who build recognizable brands across social media tend to keep a few consistent visual elements even as they resize for different formats: consistent color palette, similar framing style, consistent use of whitespace. Resizing correctly is the foundation, but that consistency is what makes your content feel cohesive across channels.
Build a simple template or system for each platform. It doesn't have to be elaborate. Even just a set of saved presets in your resizer tool means you're always exporting the right dimensions without having to look them up each time.
The goal is making this automatic enough that you stop thinking about it and just do it. Once resizing becomes part of your workflow rather than an occasional scramble, your content will consistently look better across every platform.