Landscape to Portrait Photo Conversion | Cliptics
You just took a great photo in landscape mode. Wide, cinematic, gorgeous. Then you open Instagram, try to post it as a Story, and half your image gets cropped into oblivion. The subject is gone. The composition is ruined. Sound familiar?
This happens constantly because every social platform expects a different size, and most of them favor portrait or square formats. If you primarily shoot in landscape, you need a reliable way to convert those images without destroying what made them good in the first place.
Here is exactly how to do that, platform by platform, with the specific dimensions you need.
Why Landscape Images Fail on Social Media
The core issue is simple. Landscape photos are wider than they are tall. Most social feeds, especially on mobile, are designed around vertical scrolling. A portrait image fills the screen. A landscape image sits in the middle with empty space above and below it, looking small and underwhelming.
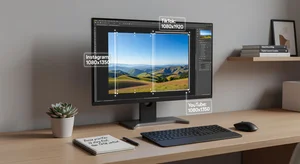
Instagram Stories and Reels expect 1080 x 1920 pixels. TikTok wants 1080 x 1920. Pinterest pins perform best at 1000 x 1500. Even Facebook and LinkedIn increasingly reward vertical content in their algorithms because it holds attention longer on phones.
So unless you are posting strictly to YouTube or Twitter/X where landscape still works, you are fighting the format every time you share a horizontal image.
The Exact Dimensions You Need
Let me save you the research. Here are the dimensions that matter in 2026, organized by platform.
Instagram: Post (square): 1080 x 1080 Post (portrait): 1080 x 1350 Story/Reel: 1080 x 1920 Profile photo: 320 x 320
TikTok: Video/Photo: 1080 x 1920 Profile photo: 200 x 200
YouTube: Thumbnail: 1280 x 720 Shorts: 1080 x 1920 Channel banner: 2560 x 1440
Pinterest: Standard pin: 1000 x 1500 Idea pin: 1080 x 1920
Facebook: Post: 1200 x 630 Story: 1080 x 1920 Cover photo: 820 x 312
LinkedIn: Post: 1200 x 1200 Story: 1080 x 1920
Twitter/X: Post: 1600 x 900 Profile header: 1500 x 500
Save this list. Bookmark this page. You will reference it more often than you expect.
Three Methods for Converting Landscape to Portrait
There is no single right way to do this. The best method depends on what is in your photo and where you plan to post it.
Method 1: Crop and Reframe
The fastest approach. You take your landscape image, set the target aspect ratio (like 4:5 for Instagram or 9:16 for Stories), and crop to the most important part of the frame.
This works well when your subject is concentrated in one area. A person standing center frame. A product on a table. A building against the sky. You just need enough resolution that the cropped version still looks sharp.
The Cliptics landscape to portrait converter handles this automatically. Upload your image, pick the target ratio, drag to position the crop, and export. No account needed, no watermarks.
The limitation is obvious. You are throwing away pixels. If the interesting parts of your landscape stretch across the full width, cropping will lose something.
Method 2: AI Extend the Canvas
This is the more interesting option and the one that has gotten dramatically better in the past year. Instead of cutting your image down, you expand it upward and downward. AI fills in what was never there.
Say you have a landscape photo of a beach sunset. The sky takes up the top third, the water and sand fill the rest. To make it portrait, you need more sky above and more sand below. An AI image extender generates those missing sections, matching the style, lighting, color palette, and texture of what already exists.
The Cliptics AI Image Extender does exactly this. Upload your landscape, choose to extend vertically, and the tool generates natural looking content to fill the new canvas space. The results are surprisingly smooth for most photos, especially landscapes, textures, and environmental shots.
Where this struggles: faces near the edge of the frame, text, or very specific architectural details. The AI can hallucinate features that look slightly off. Always check the output carefully for those cases.
Method 3: Add Borders or Background Padding
Sometimes you do not want to crop or generate new content. You just want your landscape image displayed inside a portrait frame with a clean background.
This means placing your original image centered on a taller canvas, then filling the remaining space with a solid color, gradient, blur of the image itself, or a branded background. It preserves 100% of your original photo.
This approach works especially well for product photography, screenshots, quotes, or any image where maintaining the exact original composition matters more than filling the screen.
Common Mistakes to Avoid
Upscaling low resolution crops. If you crop a 1080px wide landscape down to a 540px wide section and then stretch it back to 1080, it will look blurry. Start with the highest resolution source image you have.
Ignoring safe zones. Instagram Stories and TikTok overlay UI elements at the top and bottom of the screen. Keep important content away from the outer 10% on each edge, or your text and subjects will hide behind buttons and profile icons.
Using the same crop for every platform. A 4:5 crop for Instagram feed posts is different from a 9:16 crop for Stories. Do not assume one portrait version works everywhere. Create platform specific versions.
Forgetting about the preview thumbnail. On Instagram, your Reel or Story has a cover image that shows in your grid. That cover is displayed as a square or 4:5 crop. If your portrait image has key elements at the very top or bottom, they might get cut off in the preview.
When to Keep It Landscape
Not everything needs to be portrait. YouTube video thumbnails still perform best at 16:9. Twitter/X posts get more visual real estate in landscape. Blog featured images and website headers are almost always horizontal.
The portrait to landscape converter exists for the reverse situation. If you shot a vertical photo but need it for a YouTube thumbnail or website banner, the same principles apply in the opposite direction.
The key is matching the format to the destination, not forcing every image into the same shape.
A Practical Workflow
Here is how I handle it when I need to post the same image across multiple platforms.
Start with the highest resolution version of the photo. Open the Cliptics landscape to portrait tool. Create the 4:5 version first for Instagram feed posts, since that is the tightest portrait crop and will tell you immediately if the composition holds up. Then create the 9:16 version for Stories, Reels, and TikTok. If the crop loses too much, switch to AI extension and let the tool generate the missing sections. Export each version at the exact pixel dimensions the platform expects.
The whole process takes about two minutes per image once you have done it a few times. That is a small investment for content that actually fills the screen and grabs attention instead of floating in a tiny rectangle nobody taps on.
The Bottom Line
Landscape to portrait conversion is not complicated, but it does require knowing the right dimensions and picking the right method for each image. Crop when you can. Extend with AI when cropping loses too much. Add borders when you need the original composition intact.
The platforms are not going to start favoring landscape content on mobile anytime soon. Vertical is the default. Knowing how to work with that instead of against it is one of the easiest wins for anyone posting visual content online.