Remove Unwanted Objects From Photos With AI | Cliptics
You took the perfect photo. The lighting was gorgeous, the composition was spot on, and then you noticed it. A random stranger walking through your shot. A trash can sitting right in the foreground. A power line cutting across what should have been a clean skyline.
We have all been there. And honestly, it used to be a real problem. You either had to accept the flaw or spend twenty minutes in Photoshop with the clone stamp tool, hoping the result did not look like a smudgy mess. But things have changed dramatically, and I want to walk you through exactly how AI object removal works now because it is genuinely impressive.
How AI Object Removal Actually Works
The technology behind modern object removal is called inpainting. When you select an unwanted object in your photo, the AI does not just delete it and leave a hole. It analyzes the surrounding pixels, understands the context of the scene, and intelligently fills in what should be there. Grass continues where grass was. Sky blends smoothly into sky. Brick patterns maintain their alignment.
What makes this different from the old content aware fill is the depth of understanding. Modern AI models have been trained on millions of images, so they genuinely understand what a beach looks like, what a wall texture should be, how shadows fall across pavement. The result is not a guess. It is an informed reconstruction.
Tools like the Cliptics Object Remover make this entire process incredibly simple. You upload your image, brush over what you want gone, and the AI handles the rest. No layers, no manual cloning, no expertise required.
Common Use Cases That Actually Matter
Let me walk through the scenarios where this technology makes the biggest difference, because it is not just about removing a photobomber from your vacation shots.
Real Estate Photography
If you are a real estate agent or property photographer, you know the struggle. You are trying to showcase a beautiful home and there is a garden hose coiled up in the yard, a neighbor's car parked in the driveway, or personal items scattered across the counter. Staging a home for photos takes hours. With AI object removal, you can clean up these distractions in seconds after the shoot. The listing photos look professionally staged without the staging budget.
I have seen agents tell me they used to spend upwards of fifty dollars per listing on photo retouching. Now they handle it themselves in a couple of minutes. That adds up fast when you are listing multiple properties a month.
Landscape and Travel Photography
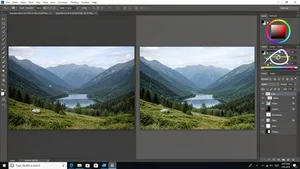
Power lines are the bane of every landscape photographer's existence. You find this incredible vista, frame it perfectly, and there are utility wires slicing right through the composition. Same goes for tourists at popular landmarks, construction equipment near scenic overlooks, or signage that breaks the mood of your shot.
The before and after difference here is dramatic. A landscape with power lines removed suddenly looks like it belongs in a travel magazine. A busy tourist spot looks serene and inviting when the crowd disappears.
Product Photography
E-commerce sellers deal with this constantly. You photograph a product and there is a shadow you did not expect, a label that needs to go, or background clutter that distracts from the item. Rather than reshooting, AI cleanup lets you fix these issues instantly. The Cliptics AI Image Editor is particularly useful here because you can combine object removal with background adjustments in a single workflow.
Watermark Removal and Image Restoration
Old family photos often have scratches, stains, or date stamps baked into the image. Modern AI tools can remove these artifacts while preserving the original photo underneath. The same applies to stock photo watermarks when you have purchased the license but only have the preview version handy. Note that removing watermarks from images you do not have rights to is not something I am endorsing here. Use this responsibly.
Step by Step: Removing Objects the Right Way
Here is my actual workflow when I need to clean up a photo. These tips apply whether you are using Cliptics, Photoshop, or any other AI powered tool.
Start with the biggest objects first. If you have multiple things to remove, tackle the largest ones before the small details. The AI produces better results when it has more clean context around the area it is filling.
Use a brush slightly larger than the object. You want to cover the entire unwanted element plus a small margin around it. This gives the AI more information about the surrounding area to work with. Too tight of a selection often leaves ghost outlines.
Check the edges carefully. After the AI does its work, zoom in to where the object used to be. Look for any telltale signs like repeated patterns, slight color mismatches, or unnatural blending. Most modern tools handle this well, but a second pass on tricky areas never hurts.
Work in stages for complex scenes. If you are removing a large object that overlaps multiple textures, like a person standing in front of both grass and a brick wall, it sometimes helps to remove it in sections rather than all at once.
Save your original first. Always keep an unedited copy of your photo before you start removing things. Sometimes you will want to go back and try a different approach, or you will realize that what you removed actually added character to the image. Having the original means you never lose anything permanently.
Things AI Still Struggles With
I want to be honest about the limitations because no tool is perfect yet. Reflections are tricky. If you remove an object that was casting a reflection in water or glass, the AI might leave the reflection behind or remove it inconsistently. You usually need to do a second pass specifically on the reflection.
Shadows can also be a challenge. The AI is getting better at recognizing that a shadow belongs to the object you are removing, but complex shadow patterns across uneven surfaces still sometimes need manual attention.
And highly detailed backgrounds behind large objects remain the hardest case. If you remove a person standing in front of a bookshelf, the AI has to reconstruct dozens of individual book spines, which is a lot to ask. The results are often good enough for social media, but they are rarely pixel perfect in those situations. For really critical work, a quick manual touchup after the AI does the heavy lifting gives you the best of both worlds.
What About Other Tools?
I have tried quite a few options in this space. Adobe Photoshop's generative fill is powerful but requires a subscription and some learning curve. Cleanup.pictures offers a solid free tier for quick fixes. Fotor and Inpaint both handle basic removals well.
What I keep coming back to is that the Cliptics Object Remover hits the sweet spot for most people. It is browser based so there is nothing to install, the AI is genuinely good at understanding scene context, and the results are ready in seconds. For watermark specific work, the AI Watermark Remover is purpose built and handles text overlays particularly well.
The real question is not which tool is best in some abstract ranking. It is which one fits your workflow. If you already live inside Photoshop, the built in tools make sense. If you want something fast and free that works in the browser, Cliptics is hard to beat.
Where This Technology Is Heading
The speed of improvement in this space is honestly a bit wild. Two years ago, removing a complex object from a busy scene would leave obvious artifacts. Today, the results are nearly indistinguishable from photos where the object was never there. AI models are getting better at understanding depth, reflections, and even how light interacts with surfaces behind removed objects.
We are moving toward real time object removal in camera apps, where you could point your phone at a scene and preview the cleaned up version before you even take the shot. Some mobile apps are already experimenting with this, and it is only going to get more smooth.
We are approaching a point where "cleaning up" a photo will be as natural and expected as adjusting brightness or cropping. The tools are already there. The quality is already there. It is just a matter of more people discovering how accessible this has become.
If you have not tried AI object removal yet, grab a photo with something you wish was not in it and give it a shot. The before and after will speak for itself.