Remove Background From Product Photos Free in 2026 | Cliptics
I have spent the last seven years photographing products for online stores. Everything from handmade jewelry on Etsy to electronics on Amazon. And if there is one thing that separates listings that sell from listings that sit there collecting dust, it is the product photo background.
Clean backgrounds convert. Cluttered backgrounds confuse. That is not an opinion. That is what the data shows across every marketplace I have worked with.
The good news? You no longer need Photoshop skills or a $200 per year subscription to get professional looking cutouts. The background removal tools available in 2026 are genuinely impressive, and several of them cost nothing at all.
Let me walk you through exactly how I handle product photo backgrounds today, what tools I trust, and the mistakes I see sellers make over and over again.
Why Background Removal Matters More Than You Think
Amazon requires a pure white background for main listing images. Etsy rewards clean, lifestyle friendly presentations. Shopify stores convert better when product images look consistent and professional.
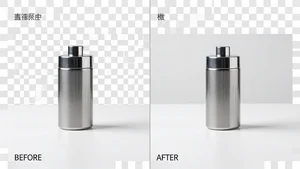
But here is the part most guides skip: background removal is not just about compliance. It is about flexibility. Once you have a clean cutout of your product, you can place it on any background you want. White for marketplace listings. Lifestyle scenes for social media. Transparent PNGs for your website banners.
One clean cutout gives you five or six usable images. That is the real value here.
Step 1: Start With a Decent Photo
No background remover, no matter how advanced, can fix a blurry product photo or one with terrible lighting. Before you even think about removing backgrounds, make sure your source image is solid.
You do not need expensive equipment. A smartphone with good lighting works perfectly. Place your product on a plain surface near a window. Natural light is your best friend. Avoid harsh shadows by using a white foam board as a reflector on the opposite side.
The cleaner the separation between your product and its background, the better any removal tool will perform. A red mug on a white table will cut out perfectly. That same red mug on a red tablecloth will give every tool a hard time.
Step 2: Choose the Right Free Tool
I have tested dozens of background removal tools over the years. Here is what actually works in 2026 without spending a dime.
Cliptics Background Remover is my go to recommendation for most sellers. You upload your image at cliptics.com/remove-background and get a clean cutout in seconds. The edge detection is sharp, which matters enormously for products with fine details like jewelry chains or fabric textures. It handles hair and fur surprisingly well too, which is relevant if you are selling pet products or clothing on models.
What I appreciate most is that it does not aggressively compress your output. Some free tools give you a cutout that looks great as a thumbnail but falls apart when you zoom in. That is a problem when marketplaces display images at full resolution.
Photoroom works well for quick batch processing on mobile. If you are shooting products with your phone and want to remove backgrounds immediately, it is convenient. The free tier has limitations on resolution though.
Pixlr offers browser based editing with a background removal feature built in. It is more of a full editor than a dedicated removal tool, which can be useful if you want to do additional touch ups in the same workflow.
Step 3: Add the Right Background
Once you have your transparent cutout, the next decision is what to put behind it. For most e-commerce purposes, you want one of three options.
Pure white (#FFFFFF) is required for Amazon main images and looks professional everywhere. The easiest way to get this right is to use a tool that lets you add a white background to your photo with precise control over the shade. Sounds simple, but I have seen sellers lose listings because their "white" was actually light gray.
Solid colors work well for brand consistency. If your Shopify store uses a specific palette, matching your product backgrounds to it creates a cohesive look that builds trust.
AI generated lifestyle backgrounds are the newer option and genuinely useful for social media content. Tools like the Cliptics AI Background Changer let you place your product in context, like a coffee mug on a cozy desk or a pair of shoes on a city sidewalk, without staging an actual photoshoot.
Step 4: Fine Tune the Edges
This is where most people stop too early. The automatic cutout is 95% of the way there, but that last 5% matters for professional results.
Zoom in to 200% and check the edges of your product. Look for halo effects, which are thin bright or dark outlines left behind from the original background. Most good tools let you feather or contract the selection slightly to clean these up.
Pay special attention to areas where your product meets a surface. The bottom of a bottle. The base of a lamp. The soles of shoes. These contact points often have subtle shadows that the AI might interpret as part of the background.
If you are selling translucent products like glassware or clear phone cases, expect to spend a little extra time on manual touch ups. Transparency confuses every background removal tool I have ever used, though the results keep improving year over year.
Step 5: Export at the Right Size and Format
This trips up more sellers than you would expect. You have a beautiful cutout, and then you export it wrong and wonder why it looks terrible on your listing.
For marketplace listings, export as JPEG at the highest quality setting your platform allows. Amazon wants at least 1000 pixels on the longest side, but I recommend 2000 pixels or more. Larger images enable the zoom feature, which increases buyer confidence.
For your own website, export as PNG to preserve transparency. This lets you change backgrounds later through CSS or place products over any design element.
For social media, match the platform dimensions. Square 1080x1080 for Instagram feed posts. 1080x1350 for Pinterest. Getting the aspect ratio right from the start saves you from awkward cropping later.
Common Mistakes I See Every Week
Inconsistent shadows. If your first three product images have a drop shadow and the fourth does not, it looks sloppy. Pick a shadow style and stick with it across your entire catalog.
Over processing. Some sellers run their images through three or four different tools trying to get a perfect result. Each pass degrades quality. Start with one good tool, make your adjustments, and export once.
Ignoring mobile preview. More than 70% of e-commerce browsing happens on phones. Your product image might look perfect on your desktop monitor but appear washed out or too small on a phone screen. Always check.
Forgetting about consistency. When a shopper scrolls through your store, every product should feel like it belongs to the same brand. Same background treatment, same lighting feel, same general composition. Background removal is the foundation of that consistency.
The Bottom Line
Removing backgrounds from product photos used to require real Photoshop expertise and hours of manual work per image. In 2026, AI powered tools handle it in seconds, and the best ones are completely free.
The workflow is straightforward: shoot a clean photo, remove the background with a reliable tool, add the right background for your platform, fine tune the edges, and export correctly. Five steps. Maybe ten minutes per product once you have the process down.
If you are selling anything online and your product photos still have messy backgrounds, you are leaving money on the table. The tools exist. They are free. There is genuinely no reason not to use them.