Transparent Image Maker: Create PNG Images With No | Cliptics
I have processed thousands of transparent PNGs over the past six years. Logos for client brands. Product cutouts for merch stores. Icon sets for app interfaces. And the one thing I keep seeing is people making this way harder than it needs to be.
Transparent images are everywhere in professional design work. Every t shirt mockup, every sticker, every overlay element on a website relies on that invisible background doing its job. But most people still fumble through the process, either using the wrong file format, getting jagged edges, or losing quality somewhere along the way.
So here is the actual workflow I use. No fluff. Just the steps that work, the tools that deliver, and the mistakes you should avoid.
Why Transparent PNGs Matter for Design Work
A transparent PNG is an image where the background has been completely removed, leaving only the subject. The file format supports an alpha channel, which is the technical term for that invisible layer behind your content. When you place a transparent PNG onto any colored background, only the subject shows. No white box. No hard rectangle. Just the element itself.
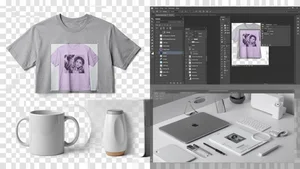
This matters for a few specific use cases. Print on demand is the big one. If you are designing graphics for t shirts, hoodies, mugs, or phone cases, your design file must have a transparent background. Every major platform including Printful, Printify, Redbubble, and Merch by Amazon requires it. Upload a JPEG with a white background onto a black t shirt and you will see exactly why.
Logos are another obvious case. Your brand mark needs to sit cleanly on any surface, whether that is a dark website header, a light business card, or a colored social media post. Without transparency, you are stuck with a colored box around your logo that screams amateur.
Web design elements like icons, badges, overlays, and UI components all need transparent backgrounds too. Same goes for social media graphics where you are layering elements on top of photos or gradients.
The Fastest Way to Create Transparent Images
The traditional approach was manual. Open Photoshop, use the magic wand or pen tool, carefully trace around your subject, delete the background, export as PNG. It worked but it was slow. A complex cutout with hair or intricate edges could take 30 minutes or more.
That entire process has changed. AI powered background removal tools now handle in seconds what used to take half an hour. The quality has gotten remarkably good, even with difficult subjects like hair, fur, translucent fabric, and complex edges.
Cliptics Transparent Image Maker is the tool I keep coming back to for this. You upload your image, the AI processes it, and you get a clean transparent PNG back. No account required. No watermarks. The edge detection handles hair and fine details better than most paid alternatives I have tested.
For batch work, this speed difference is massive. Processing 50 product photos for a merch store used to be an entire afternoon. Now it takes maybe 20 minutes including quality checks.
Getting Clean Edges Every Time
The biggest complaint people have with transparent images is edge quality. You remove the background and the subject has a faint white halo around it. Or the edges look jagged and pixelated. Or fine details like individual hair strands get chopped off.
Here is what actually causes these problems and how to avoid them.
Start with a high contrast source image. The more your subject stands out from the background, the cleaner the cutout will be. A person wearing a dark shirt against a light wall gives you perfect separation. A person wearing a beige sweater against a beige wall gives every tool a hard time.
Shoot at the highest resolution your camera allows. More pixels means more edge detail for the AI to work with. Upscaling a small image before removing the background does not help because you are just interpolating data that is not there.
Check your output at 200 percent zoom. What looks fine at normal size often reveals problems when you zoom in. Halos, fringing, and rough edges become obvious at higher magnification.
If you are working with product photos for removing backgrounds consistently, set up a simple lightbox or plain backdrop for your shoots. The investment is minimal and the time savings on every image are substantial.
File Format Decisions That Actually Matter
PNG is the standard for transparent images, but there are choices within that format that affect your results.
PNG 24 with alpha channel is what you want for photographs and complex images. It supports millions of colors plus full transparency. File sizes are larger but the quality is there.
PNG 8 is lighter weight but limited to 256 colors. Fine for simple logos and icons with flat colors. Not suitable for photographs or anything with gradients.
WebP also supports transparency and produces smaller files than PNG at comparable quality. If your images are destined for the web, WebP is worth considering. But for print on demand and professional design handoffs, stick with PNG. Compatibility is universal.
Never use JPEG for transparent images. JPEG does not support transparency at all. If you save a transparent image as JPEG, the transparent areas become white (or sometimes black). This is the single most common mistake I see from beginners.
SVG is vector based and inherently supports transparency. If your design is vector artwork like logos or icons, SVG gives you infinite scalability plus transparency. But it does not work for photographs.
Print on Demand Specific Requirements
Each platform has its own specifications, but there are common requirements across all of them.
Resolution should be at least 300 DPI for anything that will be printed. For t shirts, most platforms recommend design dimensions of at least 4500 by 5400 pixels. Smaller files will print but the quality drops noticeably.
Color mode matters. Design in RGB if the platform handles color conversion (most do). Some platforms accept CMYK files, but RGB is safer as a default.
File size limits vary. Redbubble allows up to 300MB per file. Printful caps at 200MB. Stay under these limits by using PNG compression without reducing dimensions.
Transparent areas must be truly transparent, not white or near white. Some tools output what looks transparent on screen but actually contains very light gray pixels. These show up on dark colored products. Always verify by placing your PNG on a dark background before uploading.
Adding Backgrounds Back When You Need Them
Sometimes you need the opposite workflow. You have a transparent image and need to place it on a specific background. Product listings on Amazon require a pure white background. Some social platforms display transparency as black.
Adding a white background to a photo is straightforward with the right tool. The key is maintaining the edge quality you worked to achieve during the background removal step. A good tool will composite the layers without introducing artifacts or shifting colors.
For mockup creation, place your transparent design onto product templates. T shirt mockups, mug templates, phone case blanks. The transparency ensures your design integrates naturally with the product surface including shadows, folds, and curves.
Common Mistakes and How to Fix Them
Saving as JPEG instead of PNG. Already covered this but it bears repeating because it happens constantly.
Not checking edges on dark backgrounds. Your cutout might look perfect on white but have visible halos on dark colors. Always preview on both light and dark backgrounds.
Working with low resolution source images. Garbage in, garbage out. Start with the highest quality source you can get.
Using transparency where it is not needed. If your final output will always be on a white background, a JPEG is smaller and faster to load. Only use transparent PNGs when you actually need the transparency.
Forgetting to flatten text layers. If your design includes text, make sure it is rasterized or flattened before exporting. Some applications export text layers with anti aliasing artifacts that look fine on screen but print poorly.
Building an Efficient Transparent Image Workflow
The workflow that saves the most time across projects follows this pattern. Shoot or source your images with clean backgrounds when possible. Run them through an AI background removal tool for the initial cutout. Spot check edges at 200 percent zoom. Touch up any problem areas manually if needed. Export as PNG 24 with the correct dimensions for your intended use.
For print on demand sellers processing multiple designs per week, batch processing is essential. Upload all your source images at once, process them together, and do your quality checks in a single session rather than one at a time.
Keep your transparent PNGs organized in folders by project or product type. Name files descriptively. Six months from now you will not remember what design_final_v2_FINAL.png was supposed to be.
Transparent images are a fundamental building block of modern design work. The tools have gotten dramatically better and faster. The key is understanding the technical requirements, using the right file formats, and building a repeatable workflow that catches quality issues before they reach your customers or clients.